

I finished installing Passbolt, ran its health check command and got back eight errors. That the server key was not set. That the fingerprint did not match. That the private key could not decrypt anything.
I nearly wiped it all and started over. I did not, and just as well, because the install was perfect. All eight errors were lies.
That is more or less what installing Passbolt feels like: a product with a very good reputation, an encryption model stricter than any of its competitors, and a collection of traps most guides never mention, because they are written by someone who brought it up once and never touched it again.
I installed it, broke it on purpose, wiped the volumes and built it clean again. Every command and every terminal output you are about to see was actually run, not copied from the documentation. The domain in the examples is passbolt.itrafa.com, which is mine.
Before you spend the afternoon on this: this is for people who administer systems and have to share credentials with a technical team. The domain registrar, the firewall, the cloud console, the break-glass accounts. All the things that today live in a spreadsheet nobody wants to admit exists.
If what you are after is a password manager for your family, I will save you the afternoon: this is not it. At the end are the three tolls Passbolt charges, measured, and why they come out very expensive for someone non-technical.
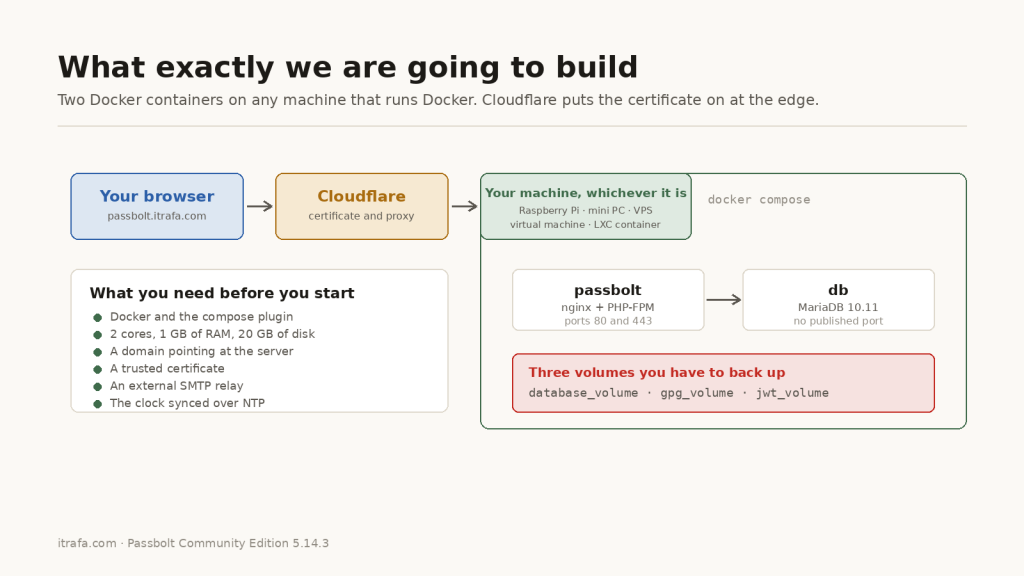
What you need
| You need | Detail |
|---|---|
| A machine running Docker | Raspberry Pi, mini PC, VPS, virtual machine or LXC container. There are images for amd64 and arm64 |
| Resources | 1 GB of RAM is enough: the whole stack uses 219 MiB. 2 cores and 20 GB of disk |
| Docker and Compose | guide here if you have never installed it |
| A domain of your own | An IP will not do. A subdomain is enough |
| A trusted certificate | Free with Cloudflare |
| A mail relay | Mandatory. Without it you cannot onboard anyone |
And what you get out of it, which is the part you need to be able to explain to whoever signs off the budget: unlimited users and groups, with no per-seat cost. The competition charges between four and six dollars per user per month for this. Move the sliders with your own team’s numbers:
How much are you paying for something you could host yourself?
That is what you stop paying. Passbolt does not charge per seat: the same server works for fifteen people and for a hundred and fifty.
And before you go asking for a server: you probably already have one. Every office has a tower that was retired because it felt slow for what it was doing, a laptop replaced by a newer one, a mini PC left over after a move. Any of those will run this comfortably, because the whole stack uses 219 MiB. The machine that is already written off and gathering dust in a cupboard is exactly the profile you need.
The three requirements that are not optional
A domain and a trusted certificate. An IP will not do, nor HTTP, nor a self-signed certificate: the interface uses browser cryptography that only works in secure contexts.
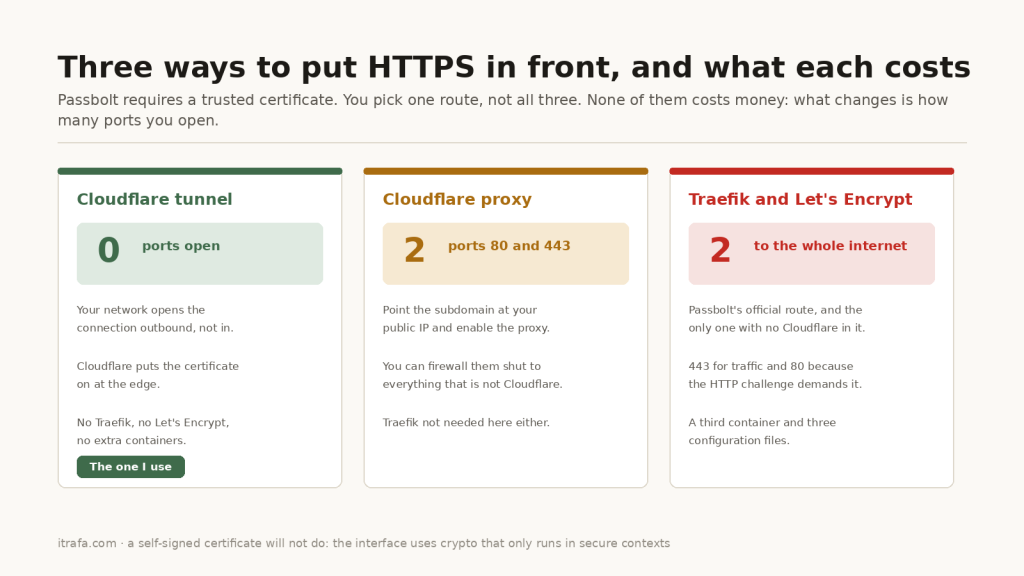
I am assuming you already have a domain: reserving a subdomain inside the one you use is enough, and that costs nothing extra. From there you have three routes, and you pick one, not all three. None of them adds a dollar to the bill; what changes between them is how many ports you end up opening on your router:
- A Cloudflare tunnel. This is the one I use. Zero open ports: your network opens the connection outbound, not the other way round, and Cloudflare puts the certificate on. With this you are done, you need neither Traefik nor Let's Encrypt nor any extra container.
- Point the subdomain at your public IP and enable the Cloudflare proxy, which issues and renews the certificate for free. Here you do open 80 and 443, although you can firewall them shut to anything not coming from Cloudflare's ranges. Traefik is not needed here either. The full process is in how to connect your domain to Cloudflare.
- Traefik with Let's Encrypt, Passbolt's official route and the only one that does not put Cloudflare in the middle. That is its merit and also its bill: you open 80 and 443 to the whole internet, 443 for traffic and 80 because Let's Encrypt's HTTP challenge demands it. In exchange you depend on Cloudflare for nothing. It is also the only one of the three that forces you to touch the deployment: you add a third container to the same deployment file plus three configuration files,
traefik.yaml,conf/headers.yamlandconf/tls.yaml. They document it in their automatic HTTPS guide for Docker.
If you go with Cloudflare, two warnings. The first is about the SSL/TLS encryption mode, and it is worth understanding which hop it applies to, because it is not the one you would assume:
- With a tunnel: the zone mode does not govern the connection between
cloudflaredand your service. That hop is controlled by the tunnel itself, under Origin request. If your origin carries a self-signed certificate, you enable No TLS Verify there and that is it. You can keep the zone on Full (strict) without any problem, which is how I have it. - Without a tunnel, pointing the subdomain at your public IP: there the zone mode does rule. With a self-signed certificate, Full (strict) will fail on you. The good solution is not to drop to Full, but to install a Cloudflare Origin CA certificate on your server, which is free and lets you stay on Full (strict).
The second warning: Cloudflare's free certificate covers yourdomain.com and one level of subdomain, but not two.
A mail server, or an SMTP relay. And here is a downside of Passbolt, said plainly: you depend on a third-party service that usually costs money. In Passbolt email is not a convenience, it is infrastructure: signups, recoveries and the notices telling you somebody shared something with you all travel through it. Without email, you cannot onboard anyone. Fortunately there are services with a free tier that is more than enough for this.
I use SMTP2GO, which gives you a thousand emails a month and two hundred a day without asking for a card, and is built for transactional email rather than campaigns. I wrote a whole article about it, because setting it up properly has more detail than it looks: there I explain why you should not touch your SPF record, which of the three DNS records is better left uncreated, and why outbound email is the one thing I do not recommend self-hosting.
If you prefer another one, Passbolt ships ten ready-made configurations: AWS SES, Elastic Email, Google, Mailchimp, Mailgun, Mailjet, Office 365, Sendgrid, Sendinblue and Zoho. Anything else, SMTP2GO included, goes in through the Others option.
And one piece of advice before you choose, and it applies to any of them: check whether the one you like turns on open tracking and link rewriting by default. For a newsletter that is normal; for the emails from your password manager, you do not want it. This is not fussiness: the large providers score the reputation of whoever is sending, and an email full of rewritten links pointing at marketing domains has a decent chance of landing in the junk folder. And you will not find that out from any dashboard: you find out from the support ticket and the same call as always, "the email never arrived". The fewer of those, the better.
I would not recommend running a Postfix on the same server either: without SPF and reverse DNS it ends up in the junk folder. And above all, do not overcomplicate it. I am giving you free alternatives that work in ten minutes; save the effort for more entertaining projects, which I will get to.
The clock in sync. One-time codes and token validation depend on it. Check with timedatectl.
If you build it inside a Proxmox LXC container
This is how I do it, because it is what I have. If you are going another route, skip ahead to the install.
There is one checkbox to decide, and it is behind half the failed attempts to run Docker on Proxmox: you have to enable nesting. With the container selected, go to Options → Features → Edit and tick the box.

Or from the command line, on the Proxmox node:
# Replace 131 with your container ID
pct stop 131 && pct set 131 -features nesting=1 && pct start 131
If it is missing, Proxmox warns you at boot, although the message never mentions Docker: WARN: Systemd 255 detected. You may need to enable nesting.
The keyctl myth
Ticking one extra box costs nothing, and the comfortable thing would have been to tick it, carry on with the install and never think about it again.
Almost every tutorial will tell you to enable a second box, keyctl. And that is not their invention: it is what the official Proxmox documentation says, in these words, "this is required if you want to use Docker inside a container".
The problem is that I had in front of me a container with eight Docker services that had been running for days, without that box ticked. Either the documentation was wrong, or I was missing something. So instead of arguing about it I tested it: all four possible combinations, restarting the container each time.
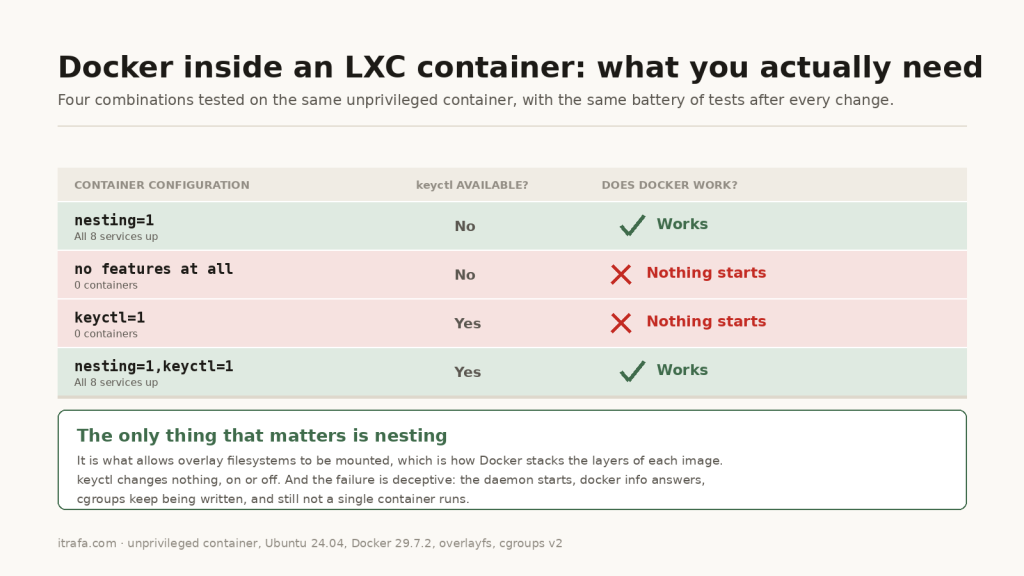
The only thing that matters is nesting. With keyctl on and nesting off, Docker will not start a single container. The error is always the same:
keyctl on and nesting off. It is always this one.There is the key: nesting is what allows overlay filesystems to be mounted, which is how Docker stacks the layers of each image. And the failure is deceptive, because the daemon starts anyway, docker info answers and cgroups keep being written. Everything looks fine until you try to run something.
The keyctl recommendation dates from when Docker used the kernel keyring. Current versions do not, and that is just as well, because enabling it can break systemd-networkd, as the documentation itself admits.
All of this was measured on an unprivileged container, the one Proxmox creates by default and the one you should use: in a privileged one, root inside is root on the Proxmox node. For something holding your team's credentials, that difference is not theoretical.
The install
Step 1: bring the system up to date
It seems obvious and that is exactly why almost every guide skips it, but on a freshly created container the first command of the next step does not work. The Ubuntu template comes minimal: no curl, no root certificates and no text editor at all, not even vi.
The second is worse than the first, because it fails in a way that misleads you: you install curl, start the download and get a certificate error that looks like a network problem or a problem with Passbolt's server. It is neither: your container simply does not know yet who to trust.
apt update && apt upgrade -y
apt install -y curl ca-certificates nano
If you already have Docker installed following the article linked above, you have done this and can skip past it. I am leaving it in because plenty of people build a clean container just for this.
Step 2: download and verify
Passbolt publishes a SHA512 sum of the deployment file. Verify it. And watch out, because it is easy to get wrong: the file is on the download server, but the checksum is on GitHub.
mkdir -p /opt/passbolt && cd /opt/passbolt

curl -LO https://download.passbolt.com/ce/docker/docker-compose-ce.yaml
curl -LO https://github.com/passbolt/passbolt_docker/releases/latest/download/docker-compose-ce-SHA512SUM.txt

sha512sum -c docker-compose-ce-SHA512SUM.txt
OK. If it says FAILED, the file is not the one Passbolt published.Step 3: the four lines you have to change
Generate a password before anything else:
openssl rand -base64 32 | tr -dc 'A-Za-z0-9' | head -c 32
Save it somewhere by hand. And yes, I am aware of the irony of writing down the password for the password manager you have not installed yet: it is the chicken and egg problem of anyone who self-hosts anything.
Now you have to edit the file you downloaded. Open it with the editor we installed at the start:
nano docker-compose-ce.yaml
This is the official file, with the four lines marked:
services:
  db:
    image: mariadb:10.11
    environment:
      MYSQL_RANDOM_ROOT_PASSWORD: "true"
      MYSQL_DATABASE: "passbolt"
      MYSQL_USER: "passbolt"
      MYSQL_PASSWORD: "P4ssb0lt"          # <-- CAMBIAR (1 de 2)
    volumes:
      - database_volume:/var/lib/mysql

  passbolt:
    image: passbolt/passbolt:latest-ce     # <-- CAMBIAR: fijar una version
    depends_on:
      - db
    environment:
      APP_FULL_BASE_URL: https://passbolt.local   # <-- CAMBIAR: tu dominio
      DATASOURCES_DEFAULT_HOST: "db"
      DATASOURCES_DEFAULT_USERNAME: "passbolt"
      DATASOURCES_DEFAULT_PASSWORD: "P4ssb0lt"    # <-- CAMBIAR (2 de 2)
      DATASOURCES_DEFAULT_DATABASE: "passbolt"
      PASSBOLT_SECURITY_PROXIES_ACTIVE: "true"    # <-- ANADIR si usas proxy inverso
    volumes:
      - gpg_volume:/etc/passbolt/gpg
      - jwt_volume:/etc/passbolt/jwt
    command:
      ["/usr/bin/wait-for.sh", "-t", "0", "db:3306", "--", "/docker-entrypoint.sh"]
    ports:
      - 80:80
      - 443:443

volumes:
  database_volume:
  gpg_volume:
  jwt_volume:
- The password appears twice. They have to match each other and differ from the example. Whoever copies and pastes without looking ends up with the same password as thousands of installs.
APP_FULL_BASE_URL: your real domain, with the protocol and no trailing slash. If it is wrong, the instance starts and seems to work, but the links in the emails point somewhere that does not exist.- Pin a version instead of
latest, as their documentation recommends. The published ones are on Docker Hub. PASSBOLT_SECURITY_PROXIES_ACTIVEis not in the file and is needed whenever there is anything in front: nginx, Traefik, Caddy and also Cloudflare, both with the proxy enabled and with a tunnel. Without it, every action by every one of your users gets logged with the proxy's IP, and your log stops being good for the one thing a log is good for. With it, Passbolt trusts theX-Forwarded-Forheader, so only enable it if there really is a proxy in front: if Passbolt is exposed directly, anyone can forge that header and show up in your log with whatever IP they like.
With the four lines changed, save: press Ctrl+X, it asks whether you want to save, you answer Y and confirm the filename with Enter. Three keys and you are out.
If you prefer the command line:
DBPASS=$(openssl rand -base64 32 | tr -dc 'A-Za-z0-9' | head -c 32)

sed -i "s|P4ssb0lt|$DBPASS|g" docker-compose-ce.yaml
sed -i "s|https://passbolt.local|https://passbolt.itrafa.com|" docker-compose-ce.yaml

# It has to return 0
grep -c 'P4ssb0lt\|passbolt.local' docker-compose-ce.yaml
Step 4: bring it up
docker compose -f docker-compose-ce.yaml up -d

# Follow the startup
docker compose -f docker-compose-ce.yaml logs -f passbolt
RUNNING appears, the stack is up.Careful with the second command, because it does not finish on its own: the -f option stays attached to the log and keeps printing as things happen. When you see the line INFO success: nginx entered RUNNING state, it is up and you can leave with Ctrl+C.
And do not be shy about pressing it: Ctrl+C only stops showing you the log, it does not stop anything. The containers were started with -d, which is what leaves them running in the background, and there they stay. You can check with docker compose -f docker-compose-ce.yaml ps.
On my container it took 27 seconds. You will also see two nginx warnings about the listen ... http2 directive. They come from inside the image, not from anything you wrote, and there is nothing you can do about them. It is the first of several messages this tutorial will ask you to ignore.
Step 5: publish it on your domain
So far the containers are running, but they only listen inside your machine. They publish ports 80 and 443, and that is where it ends: from outside, your domain still leads nowhere.
This step cannot be left for later, and it is an easy mistake to make: step 7 generates a link against your domain, and if the domain does not answer, that link opens nothing. It is the only one you have to get in the first time.
This is where the route you picked at the start applies. I go with a Cloudflare tunnel. The full tunnel setup, from creating it to installing cloudflared, is in expose your services without opening ports; here I only cover what is specific to Passbolt, which is two screens.
The first is the public hostname. Subdomain passbolt and your domain, and Cloudflare creates the DNS record itself:

The second is where it sends the traffic, and this is where the detail that trips people up lives. Type HTTPS, URL localhost, and then, under Origin request, you enable No TLS Verify:

Why that switch is needed, and why it is not optional. I looked inside the image rather than assuming. The container listens on 80 and on 443, and it generates the certificate for 443 itself at startup, with this name:
CN=www.passbolt.local
There it all is. It is self-signed, so no authority backs it, and on top of that it is called www.passbolt.local, which is never going to match your domain. cloudflared validates the origin certificate by default: it runs into that, does not trust it and drops the connection. No TLS Verify is what tells it not to validate on this hop.
And why this is not a hole. That hop is cloudflared talking to localhost, inside the same machine: the traffic never reaches a network where anyone could sit in the middle. It is the same reasoning as before, the one about why your zone can stay on Full (strict) with a tunnel: what decides the encryption facing the internet is Cloudflare, and you are not touching that.
If you would rather not touch that switch, the alternative is type HTTP and URL localhost:80: the container listens there too and works just the same. I go with HTTPS so the whole path is encrypted, even if it is with a certificate nobody validates. Either one works; what does not work is HTTPS without the switch, because then the tunnel will not come up.
If you are going with the Cloudflare proxy or with Traefik, now is the moment to point them at your server, at 443 or at 80 as you prefer, using the same reasoning I just explained.
And before moving on, check it. Passbolt publishes a status endpoint that answers without needing to log in:
curl -s https://passbolt.tudominio.com/healthcheck/status.json
I use that endpoint and not the front page for a reason: asking for the root returns a 302 to the login form, and a badly pointed proxy will give you a 302 too while redirecting somewhere else. That JSON can only come from Passbolt, so if you see it, the whole path is right end to end.
If it does not answer here, stop and fix it. Carrying on without this is a guarantee that the signup link will not work when you get to it.
Step 6: configure email
This step comes before creating your account on purpose. In Passbolt email is not an extra, it is infrastructure: signups, recoveries and the notices telling you somebody shared something with you all travel through it. If you leave it for later, the link for your own signup never reaches you and you have to go and rescue it from the database.
You need the four details of your relay: server, port, username and password. If you do not have any yet, the article on a free SMTP relay with SMTP2GO gets you them in ten minutes and without a card.
There are two ways to give them to Passbolt, and both are valid.
With variables, in the deployment file itself
This is the one I prefer, because it stays written next to the rest of the configuration and restores itself when you rebuild the container.
They go in the environment: block of the passbolt service, which is the second one in the file. Watch out for that, because there are two environment: blocks and the first is the database's: if you put them there, nothing reads them.
This is how that whole service ends up. The ones at the top are the ones you already touched in step 3, and the seven at the bottom are the new ones:
  passbolt:
    image: passbolt/passbolt:5.14.3-ce
    depends_on:
      - db
    environment:
      APP_FULL_BASE_URL: https://passbolt.tudominio.com
      DATASOURCES_DEFAULT_HOST: "db"
      DATASOURCES_DEFAULT_USERNAME: "passbolt"
      DATASOURCES_DEFAULT_PASSWORD: "tu-contrasena"
      DATASOURCES_DEFAULT_DATABASE: "passbolt"
      PASSBOLT_SECURITY_PROXIES_ACTIVE: "true"

      # ---- from here, the new email lines ----
      EMAIL_TRANSPORT_DEFAULT_HOST: mail.smtp2go.com
      EMAIL_TRANSPORT_DEFAULT_PORT: 587
      EMAIL_TRANSPORT_DEFAULT_USERNAME: TU_USUARIO
      EMAIL_TRANSPORT_DEFAULT_PASSWORD: TU_CONTRASENA
      EMAIL_TRANSPORT_DEFAULT_TLS: "true"
      EMAIL_DEFAULT_FROM: [email protected]
      EMAIL_DEFAULT_FROM_NAME: Passbolt
      # ---- to here ----

    volumes:
      - gpg_volume:/etc/passbolt/gpg
      - jwt_volume:/etc/passbolt/jwt
I did not invent the names or take them from the documentation: they are in /etc/passbolt/app.default.php, inside the image itself. That also shows that if you set nothing, Passbolt tries to send through localhost on port 25, where nobody is listening. That is why, without configuring this, the emails do not fail with a clear error: they sit in the queue.
And watch the sender: EMAIL_DEFAULT_FROM has to be an address on your own domain, the same one you verified at the relay. With another domain the email goes out but lands in the junk folder.
After editing the file you have to recreate the container so it reads the new variables:
docker compose -f docker-compose-ce.yaml up -d
Or through the interface, once you are in
If you would rather not touch files, Passbolt has the email configuration in the admin interface, under Administration → Email server, which internally is the path /app/administration/smtp-settings. That is where the ten ready-made providers live, and where SMTP2GO goes in through the Others option.

Look at the box on the right, which answers the obvious question raised by having two ways to configure the same thing: Configuration source tells you where what is actually in use comes from. Mine says environment variables because I put it in the deployment file. If I had typed it on this screen, it would say something else. You do not have to guess which of the two wins: it tells you.
The catch with this route is the chicken and egg one: to get into the interface you need your account, and to receive your account link you need email. It is solvable, because the link also comes out on the command line in the next step, but it is a detour. That is why I set it up beforehand.
And test it before moving on
Passbolt has a command for this, so there is no guessing:
docker compose -f docker-compose-ce.yaml exec passbolt \
  su -m -c "/usr/share/php/passbolt/bin/cake passbolt send_test_email \
  [email protected]" -s /bin/sh www-data
If that email arrives, you can carry on with a clear head. If it does not, stop here: everything that follows depends on it.
Step 7: create the first administrator
This step is not optional and there is no way around it: the Docker deployment has no first-run web wizard. The first account is created on the command line, full stop, whether you configured email or not. The difference is that, since you already configured it in the previous step, the link will also land in your inbox.
docker compose -f docker-compose-ce.yaml exec passbolt \
  su -m -c "/usr/share/php/passbolt/bin/cake passbolt register_user \
  -u [email protected] -f Rafael -l Gomez -r admin" -s /bin/sh www-data
That is the signup link for your administrator account. Since email is already configured from the previous step, that same link has just arrived in your inbox: if you open the email, there is a Get started button that does exactly the same thing. That is the normal route, and the one the people you invite later will use.
Even so, copy it and paste it into a notepad. The terminal prints it once: if you close it or scroll away, there is no way to ask for it again, and getting it back means the database query I leave for the end. It costs two seconds and saves you that detour the day the email is slow or lands in junk.
Whether you go through the email or the copied link, what you do with it is the same: paste it into the address bar of the browser where you have the Passbolt extension installed, which is what we do in the next section.
The health check that says everything is broken
The startup error that is not an error
Before you look at any health check, there is one that can show up in the logs and means nothing. If you run logs -f right after bringing it up, or after recreating the containers, there is a good chance you will see this:
What is happening is that Passbolt starts up faster than MariaDB takes to be ready. The database container already accepts network connections, but it has not finished preparing its users, so it turns Passbolt away. A few seconds later it works, and there is nothing to do.
The problem is that the message pushes you in exactly the wrong direction. It says "Access denied" and mentions the password, so the natural move is to start reviewing passwords in the compose file, which is not where the fault is. I lost a good while doing precisely that.
What tells one case from the other is not the message, it is the time. Compare the time of the error with the time the database container started:
docker compose -f docker-compose-ce.yaml ps
docker compose -f docker-compose-ce.yaml logs --tail=30 passbolt
- If the error is earlier than the database finishing its startup, and the logs afterwards carry on with normal requests, it was this. Ignore it.
- If the error is repeating right now, with the database up for a while, then it really is about credentials and it is time to look at the
composefile.
Back to the eight errors from the beginning, because they are going to happen to you too.
Passbolt ships a health check command. It is the first thing anyone runs after installing, out of that healthy instinct to make sure everything is fine before putting your team's passwords inside. This is the command, so you can check for yourself:
docker compose -f docker-compose-ce.yaml exec passbolt \
  su -m -c "/usr/share/php/passbolt/bin/cake passbolt healthcheck" -s /bin/sh www-data
And on a freshly built Docker deployment, this is what it returns:
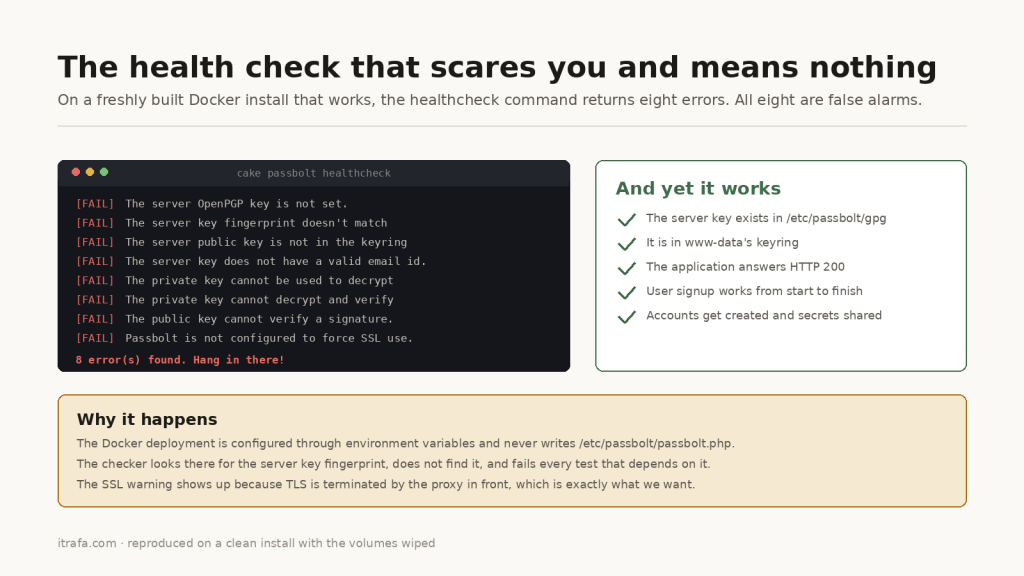
Your install is not broken. The key exists, it is in the keyring, the application answers and user signup works from start to finish. What happens is that the Docker deployment is configured through environment variables and never writes the file /etc/passbolt/passbolt.php; the checker looks there for the fingerprint, does not find it, and fails every test that depends on it. And the SSL warning shows up because TLS is terminated by the proxy in front, which is what we want.
It is worth knowing before you run it. This is the kind of output that makes someone wipe a perfectly healthy install and start over.
Signing up: three screens, and all three matter
Before you open the link, a warning: the browser extension is not optional. Without it you will not see a login form, you will see a screen sending you off to install it, and there is no way around it. You cannot even create your account.

You install it from your browser's store, and it is worth checking it is the official one: it is published by Passbolt SA, it is marked as featured and four hundred thousand people use it. There are copies with similar names, and for an extension that is going to hold your private key, that ten second check is not wasted.

With the extension in place, the wizard first asks for the passphrase. It is the only one you will need to remember, and if you forget it there is no recovery in the free edition.
And here is a detail I was not expecting and that is worth the space: Passbolt checks whether the passphrase you are typing appears in a known breach. If it does, it does not warn you and carry on: it blocks you, the button stays disabled.

The obvious question is where it sends your passphrase to find that out, and the answer is that it does not send it: it queries the breached password service sending only a fragment of the cryptographic hash, never the passphrase. It is the same model Have I Been Pwned uses.
That said, here is a story that says a lot about how this project works. In April 2024, researchers at Quarkslab found that that check was being made as you typed, letter by letter, and that those intermediate queries let you narrow the passphrase down by brute force far faster than normal. That is CVE-2024-33669, medium severity.
They fixed it in version 4.6.2 of the extension, and the fix is the one you would want: the query is now made once, on submitting the form, and only if the passphrase already exceeds 60 bits of entropy. In other words, your good passphrase is never queried half typed. If you are installing this today it does not affect you, but it tells you something important: they publish their incidents with a name, a date and who found them.
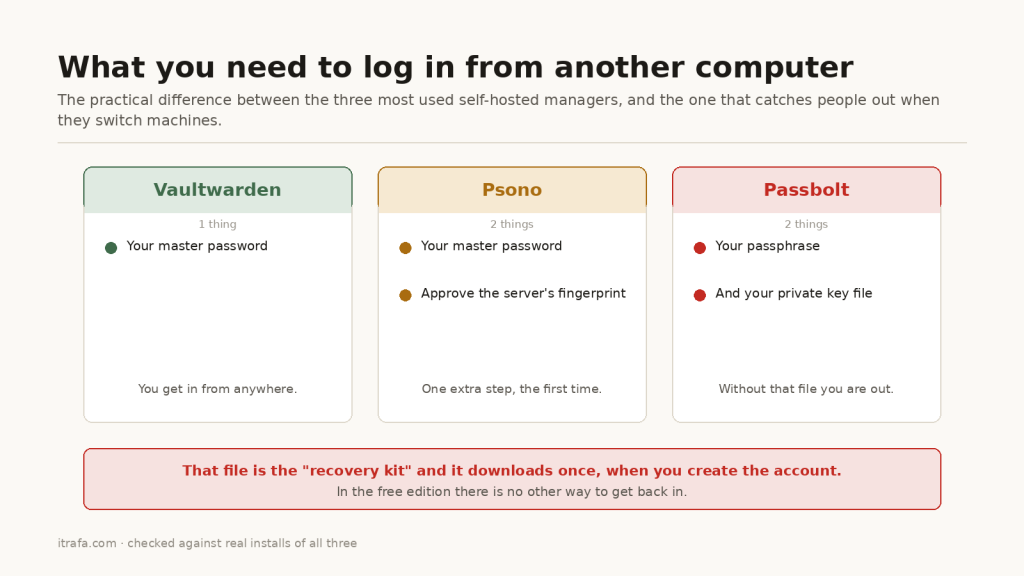
The second screen is where Passbolt parts ways with everything else, and where most people get it wrong: the recovery kit.

- To log in from another computer you need that file. Your passphrase alone is not enough.
- If you reinstall, change browser or lose the profile and you do not have it, your account is unrecoverable.
- The account recovery an administrator manages is a paid feature.
Store it where you would store a copy of a private SSH key.
The third screen tends to get skipped and deserves attention: the security token, a colour and three characters that you choose.
What is interesting is where it comes back. Every time the extension asks for your passphrase, it shows your token inside the field:

There is the defence. A fake site copying this dialog pixel by pixel cannot guess the colour or the three letters, because it has never seen them: they live in your extension, not on the server. If one day you are asked for your passphrase and the box is not yours, do not type it.
It is a protection neither Vaultwarden nor Psono have, and it costs nothing: three letters you pick once.

If you lose the browser, or the passphrase
Earlier I said that if you forget your passphrase there is no recovery in the free edition. That is true, but it falls short and can scare you more than it should, because there are two different losses and only one of them is final.
| What you have lost | What happens |
|---|---|
| The browser, the computer or the extension | Fixable. You need the recovery kit and the passphrase |
| The recovery kit, but you still have the passphrase | Fixable if you have a copy of the private key somewhere else |
| The passphrase | Not fixable. Not by you and not by an administrator |
The reason the last one has no way back is the same thing that makes Passbolt secure: the server stores your public key, never the private one. Without the passphrase that private key does not open, and without it your secrets are encrypted bytes nobody can decrypt. It is not a limitation of the free edition, it is the design.
The normal case: a new browser
This is the one that will actually happen to you. You change computer, reinstall the browser or try from another one, and Passbolt does not recognise you, because your private key lived in the extension. To get back in you need three things:
- The recovery kit, that file you downloaded when you signed up and that holds your private key.
- The passphrase, which opens that key.
- A recovery link, which is the only part the server can give you.
The normal way is to request that link from the login screen and get it by email. But if email is not working yet, or if you are the only administrator and you have locked yourself out, you generate it by hand from the server.
Generating the link from the server
The command is recover_user, and it has a trap that makes the first attempt fail: Passbolt refuses to run its commands as root. You have to launch it as the web server user, which in the Docker image is www-data.
su -s /bin/bash -c "…" HTTP_USER, which is not exactly the form I use: both work. That link is single use, so do not paste it where you should not.Notice that no extra option was needed: there was already an active token because half an hour earlier I had requested recovery from the login screen, and the command reused it. If there is none, the command tells you and suggests adding --create (or -c) to generate one. With the link in front of you, open it in the browser you want to get back into, import the kit, type the passphrase and you are in.
That link is single use and it expires. If somebody intercepts it before you do, it is no good to them without your kit and your passphrase, but even so, do not send it through a channel you do not control.
And if what you lost is the passphrase
There is no command that helps here. The only thing an administrator can do is delete your user and invite you again, and it is worth knowing exactly what that means: you come back with a new key, and that key decrypts nothing from before. The secrets that were shared with you have to be shared again, one by one, from an account that can still read them.
That is why the recovery kit and the passphrase are not stored in the same place, and why the passphrase is the only thing you really have to remember.
If the email still does not arrive
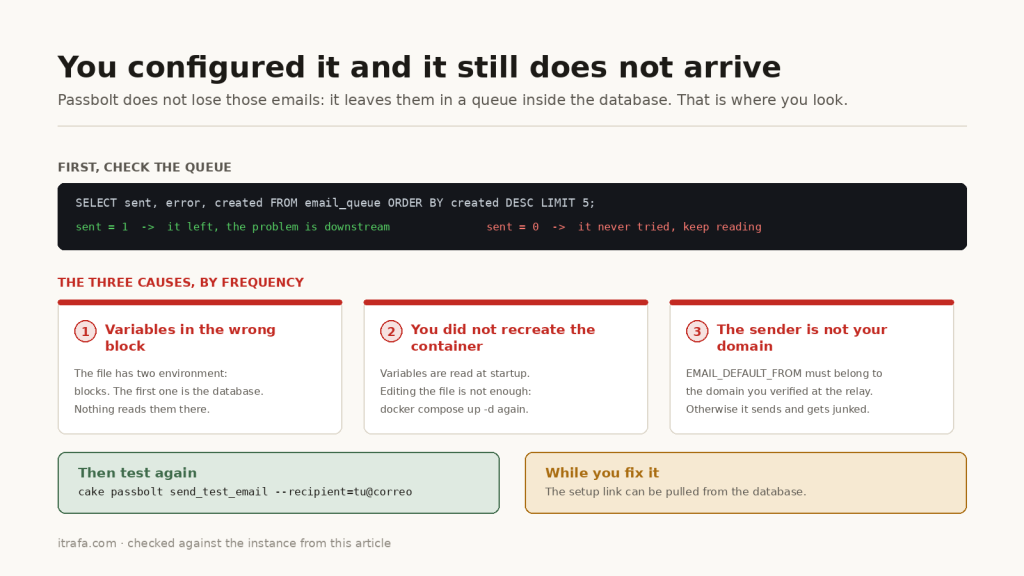
environment: blocks in the file and only one is the right one.It happens: you configured the relay in step 6, the test email never arrived and now you cannot get in. Passbolt does not lose those messages, it leaves them in a queue inside the database, so you can go and look. If the sent column is 0, that email never went out. And to unblock yourself while you fix it, the signup link can be rebuilt by hand:
docker compose -f docker-compose-ce.yaml exec db \
  mariadb -u passbolt -p passbolt -N -B -e "
SELECT CONCAT('https://passbolt.itrafa.com/setup/start/', t.user_id, '/', t.token)
FROM authentication_tokens t
JOIN users u ON u.id = t.user_id
WHERE u.username = '[email protected]'
  AND t.active = 1
ORDER BY t.created DESC LIMIT 1;"
It returns the full URL, ready to paste. It works for signups and for recoveries alike. But let us be clear: this is a patch to get you moving, not the solution. If you have ended up here, your email is misconfigured, and that has to be fixed before you bring anyone else in: without email, your team can neither sign up nor recover their account.
What happens when you share a password
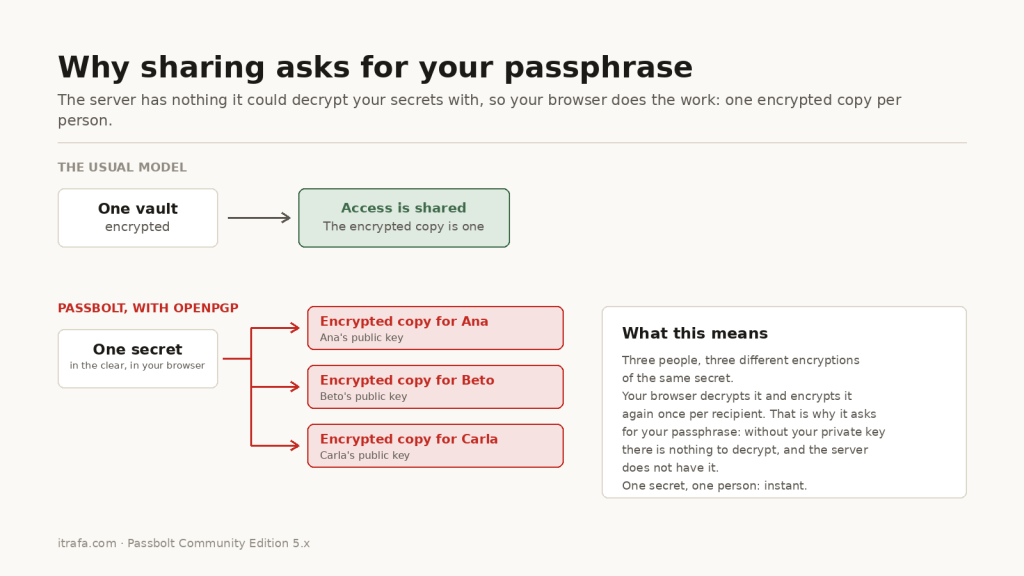
This is where Passbolt's model stops being a line from a brochure and starts to show. In almost every other manager, sharing means giving access to something that is already encrypted: there is one copy and you open the door to somebody else. Passbolt cannot do that, because the server has no key with which to decrypt anything.
You verify it by sharing once. I created a second account and shared a test resource with it. It is three screens and the interesting one is the second.
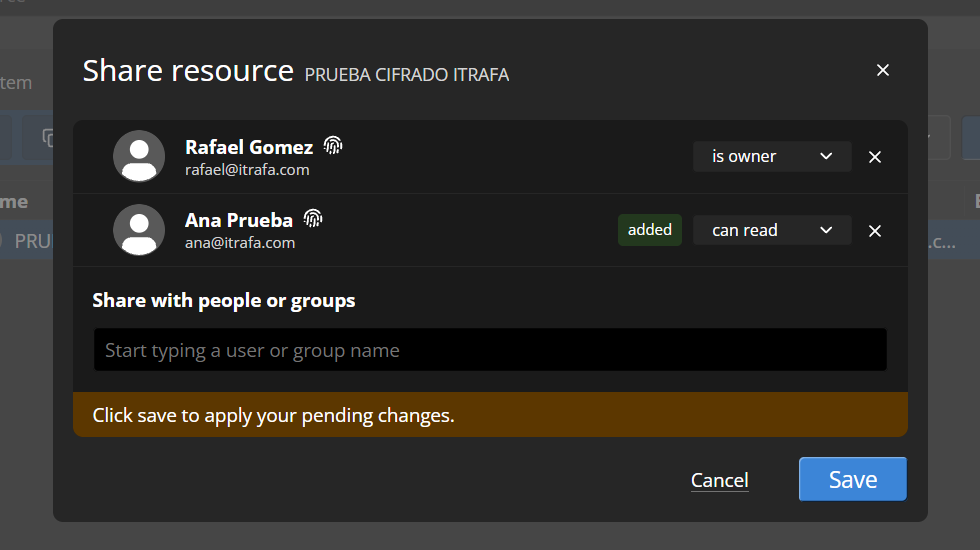
1. You pick who with
Nothing unusual yet. You add the person and give them a permission.
2. It asks for your passphrase
And here is the thing that gives it all away.
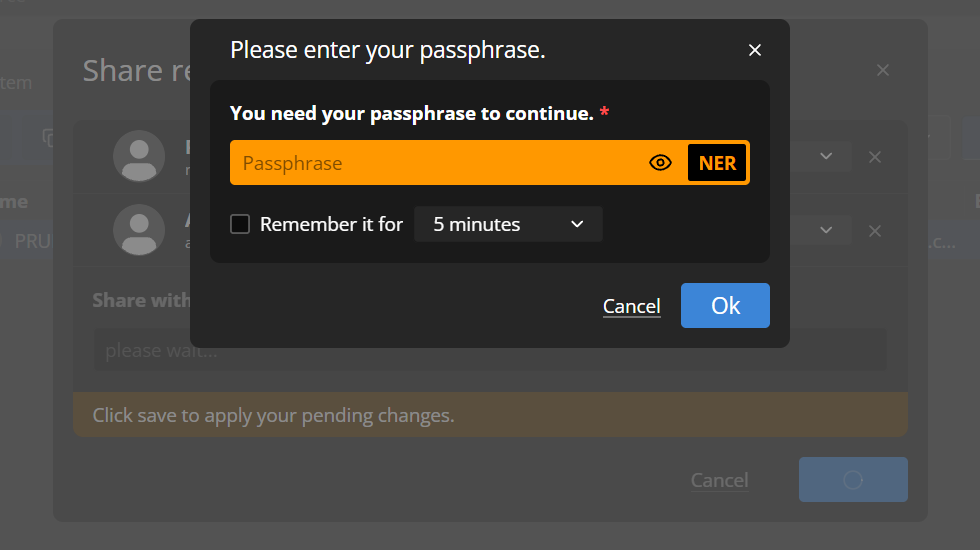
Think about what it means that it asks you for it. Your browser has to decrypt the secret in order to encrypt it again with Ana's public key. And to decrypt it, it needs your private key, which is protected by that passphrase.
A manager that only had to grant Ana access would need nothing from you. Changing a permission in its database would be enough. The fact that it asks for your passphrase is the proof that the cryptographic work happens on your machine and not on the server.
3. And it does the work
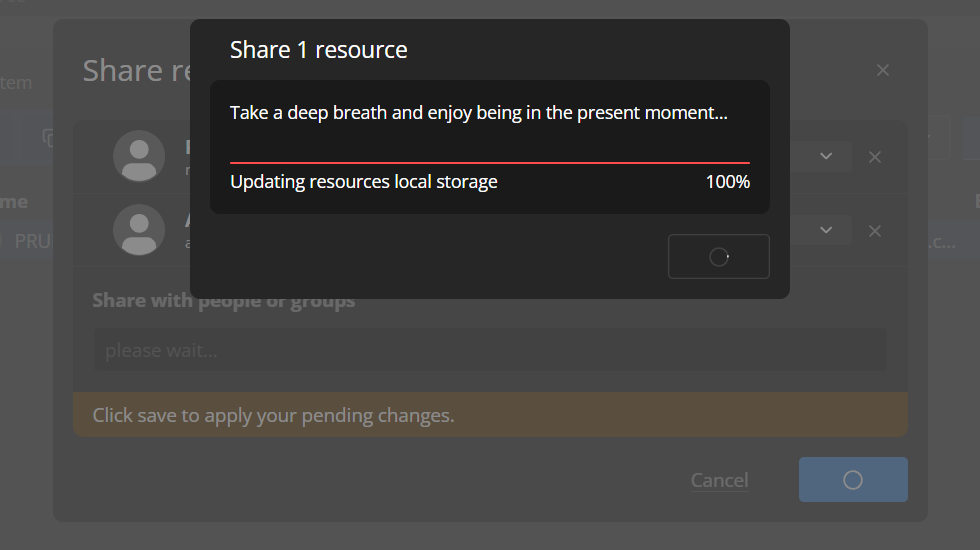
A note on speed, because I have read the opposite in several places and it did not match what I saw when I tested it: with one secret and one person it is instant. The progress bar appears and disappears. There is no wait worth mentioning.
Where you do notice it is when the numbers grow, because the work is one operation per secret and per recipient. Sharing a folder of fifty passwords with five people is two hundred and fifty encryption operations, and those happen in your browser. That is where the waiting is, not in sharing a single one.
And from this comes the uncomfortable consequence of the model: revoking someone's access deletes their encrypted copy, but it does not delete what they already read. If that person saw the password, it has to be changed. That is true of any manager, but it is worth being clear about when the system looks this airtight.
The proof, in the database
Everything above is what the interface shows you. This is what is actually stored, and you can repeat it on any instance.
docker compose -f docker-compose-ce.yaml exec db \
  mariadb -u passbolt -p passbolt -e \
  "SELECT u.username, LEFT(s.data,45) AS cifrado
     FROM secrets s JOIN users u ON u.id = s.user_id
    ORDER BY u.username\G"
Two rows for a single secret. It is not the same text saved twice: they are two different encryptions. And notice that both start with wV4D and diverge right after. That is not a coincidence either.
Decode wV4D from base64 and you get three bytes: c1 5e 03. The 0xC1 is an OpenPGP packet of type 1, "public-key encrypted session key", and the 03 is its version. The next eight bytes are the identifier of the key that copy is addressed to, and that is why the two texts split exactly there.
Which means every copy has written into its header who can open it.
And here is a trap that nearly got me
The logical next step is to check that those identifiers are the ones belonging to each person's keys. Passbolt stores them in gpgkeys:
docker compose -f docker-compose-ce.yaml exec db \
  mariadb -u passbolt -p passbolt -e \
  "SELECT u.username, g.key_id
     FROM gpgkeys g JOIN users u ON u.id = g.user_id
    ORDER BY u.username\G"
Ana's ciphertext said 73A18F8C2567BD89 and her table says ECF21AEE22D5B79E. It does not match. I assumed they would, I wrote that they would, and I was wrong.
The reason is that a modern OpenPGP key is not one key, it is several. There is a primary one, which signs and certifies, and hanging off it an encryption subkey. Passbolt stores the identifier of the primary, and the encryption is done against the subkey. You check it by asking gpg to show the subkeys:
# It is a public key: there is nothing to protect here
docker compose -f docker-compose-ce.yaml exec -T db \
  mariadb -u passbolt -p passbolt -N -B -e \
  "SELECT armored_key FROM gpgkeys g JOIN users u ON u.id=g.user_id
    WHERE u.username='[email protected]'" \
  | sed 's/\\n/\n/g' > ana.asc

docker compose -f docker-compose-ce.yaml exec -T passbolt \
  gpg --show-keys --with-subkey-fingerprints < ana.asc
[E], the encryption one, ends exactly in the recipient that Ana's copy carried.If you get an unsafe ownership on homedir warning, ignore it: that is gpg complaining about the permissions of the directory inside the container, and it has no bearing on what you are looking at.
With that the chain is complete, and every link can be repeated: one secret, one copy per person, each copy addressed to that person's encryption subkey, and the private key that opens it is not on the server. You do not have to take anyone's word for anything.
And a detail worth noting in passing: those keys are ed25519 for signing and cv25519 for encryption. Curve 25519, not fifteen-year-old RSA.
Before you invite your team
- Configure SMTP and test it. Do not spend a minute on anything else until that email arrives.
- Turn on the second factor in the organisation settings. TOTP is the option with no external dependencies.
- Close self registration. You have both routes: the variable
PASSBOLT_PLUGINS_SELF_REGISTRATION_ENABLED: "false", or the Self Registration switch in the organisation settings, which in the screenshot above has no star and is therefore yours. And enablePASSBOLT_SECURITY_PREVENT_EMAIL_ENUMERATIONas well. - Explain the recovery kit before signup, not after. People click "next" without reading.
- Document offboarding. Revoking access does not un-decrypt what that person already saw: the passwords they knew have to be rotated.
Backups: the part you cannot skip
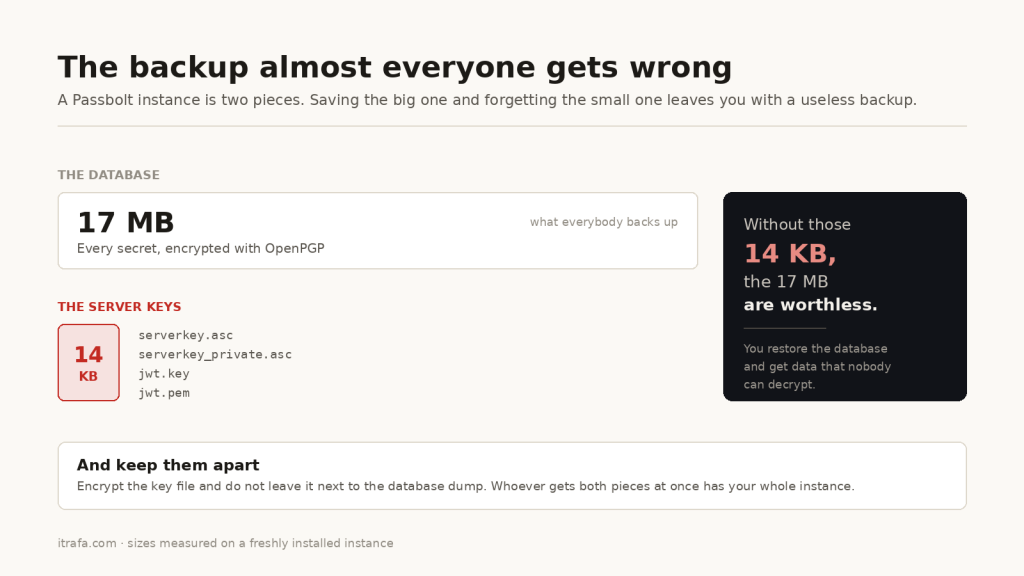
A Passbolt instance is two pieces, and both are essential: about 14 KB of keys and about 17 MB of database.
A backup of the database without those 14 KB is worth absolutely nothing. The secrets are encrypted with OpenPGP: without the server's private key, restoring the database leaves you with data nobody can decrypt.
# The database. It dumps first and only compresses if it went well:
# con `| gzip > fichero` te queda un .gz válido y vacío aunque falle.
FECHA=$(date +%F)
docker compose -f docker-compose-ce.yaml exec -T db \
  mariadb-dump -u passbolt -p passbolt > passbolt-db-$FECHA.sql \
  && gzip passbolt-db-$FECHA.sql \
  || { echo "EL VOLCADO FALLÓ, no te fíes del fichero"; rm -f passbolt-db-$FECHA.sql; }

# The server keys and the JWT ones
docker run --rm \
  -v passbolt_gpg_volume:/gpg -v passbolt_jwt_volume:/jwt \
  -v "$PWD":/salida alpine \
  tar czf /salida/passbolt-claves-$(date +%F).tgz /gpg /jwt

# And check it, which is the step everybody skips
ls -lh passbolt-db-*.sql.gz passbolt-claves-*.tgz
zcat passbolt-db-*.sql.gz | head -3
That && is not decoration. If you write mariadb-dump … | gzip > file.gz, the redirection creates the file even if the dump fails, and compressing zero bytes gives you a perfectly valid .gz of about 20 bytes. You end up with a backup that looks right and is empty. This way it dumps first and only compresses if the dump finished cleanly.
Encrypt the key file and keep it away from the database dump: whoever gets both pieces at once has your whole instance. And test the restore, because a backup that has never been restored is not a backup.
What the free edition does not have
You do not have to trust any pricing table to know what you are missing: you can see it in the interface itself, because in the organisation settings the paid options carry a star next to them.
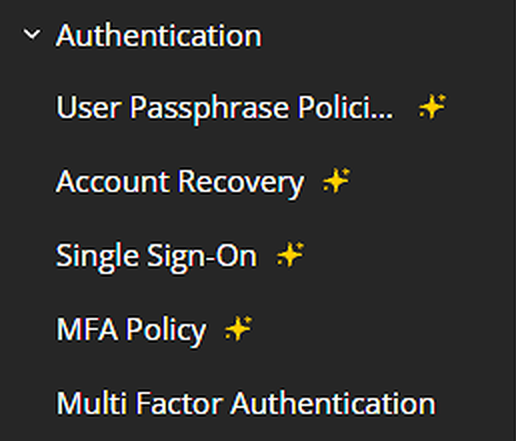
And there you can see at a glance the distinction that matters most: Multi Factor Authentication has no star, but MFA Policy does. Offering the second factor is free. Requiring people to use it is paid. Which is an enormous difference and no comparison article mentions it.
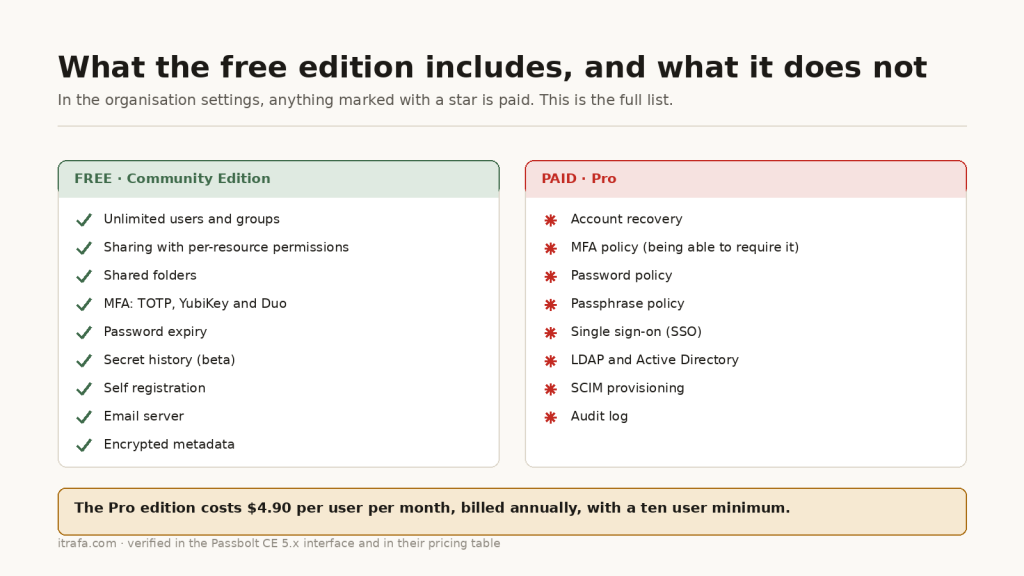
Two absences weigh more than the rest. You can offer MFA but you cannot require it: you enable TOTP, YubiKey or Duo, and each user decides. And there is no account recovery, which is worth not confusing with what we saw earlier. Getting back in from a new browser is possible, and we did it: you need your kit and your passphrase, and recover_user issues the link. What does not exist here is the organisation being able to give you back your access when you have lost the kit or the passphrase, because that needs an escrowed copy the free edition does not keep. If someone on your team forgets their passphrase, their secrets are gone and no administrator can do anything. On a team that will happen, it is only a matter of time.
The Pro edition costs $4.90 per user per month, billed annually, with a ten user minimum.
The criticisms from three years ago, checked today
In 2023, DB Tech published a video explaining why he could not recommend Passbolt for people self-hosting things at home. It still gets quoted a lot. Since I had a freshly built instance, I checked his complaints one by one.
| His complaint, in 2023 | Where it stands in 2026 |
|---|---|
| Hundreds of emails when importing a vault, one per password | Fixed. The password-created notification ships disabled |
| Every user can see every other user | Unchanged |
| The browser extension is mandatory | Unchanged |
| You need the recovery file to get back in | Unchanged |
| The passphrase is per device, you have to change it in every browser | Unchanged |
The first no longer applies: I pulled the container's defaults and PASSBOLT_EMAIL_SEND_PASSWORD_CREATE ships as false. His problem was importing a vault and getting one email per entry created; today that notification is off out of the box.
I checked the second by creating an account with a plain user role, no privileges. This is what it sees:

Full name, email address and role, so it also knows who the administrators are. Passbolt justifies this by saying it is needed for sharing, because you have to see the public key of the person you are sharing with. It is an explanation consistent with their model, but it is worth knowing before you bring in people who do not know each other.
One nuance about the original criticism: the column says Modified, not last login. What you see is when the account was modified, not when that person logged in. And the admin panel is properly locked down: that same user gets a 403 when trying to reach it.
And one thing that has changed since then
In April 2026, a change in Chromium 147's page cache left the Passbolt extension failing to initialise after signing out. They acknowledged it as an incident and fixed it the same day in version 5.11.1.
The response was fast and transparent, which is what you want from a security vendor. But the episode makes something clear: in Passbolt the browser is a single point of failure. If an update breaks the extension, there is no plan B, because there is no web vault that works without it. That is not an implementation flaw, it is the consequence of their model, and it belongs on the list of tolls.
And something that has improved, a lot
Up to version 4, Passbolt encrypted secrets end to end but stored the name and the address of each entry in the clear. The server could not read your passwords, but it did know you had an account at your bank, another at your cloud provider's console and another at your domain registrar. For a model that prides itself on the server not being able to know anything, that was a wide crack.
Version 5 closed it with what they call encrypted metadata. The 2025 write-ups explain that you have to turn it on by hand after upgrading, and that is true, but on a new install today it comes switched on out of the box. I checked by looking at the configuration of the freshly built instance:
The values a clean 5.14.3 install comes with:
And you can verify it without taking anyone's word for it. You create a password, go into the database and look at what it stored:
Before running it, two warnings that save you a while. Save a password first, because otherwise the table is empty and the query returns nothing, which looks like a failure and is not. And do not forget the \G at the end: without it the output comes back as a table and the PGP blocks mangle it until it is unreadable.
# Careful with the \G at the end: without it the output comes back as a
# table and the PGP blocks mangle it until nothing is readable.
docker compose -f docker-compose-ce.yaml exec db \
  mariadb -u passbolt -p passbolt -e \
  "SELECT name, uri, username, LEFT(metadata,60) AS metadata FROM resources\G"

docker compose -f docker-compose-ce.yaml exec db \
  mariadb -u passbolt -p passbolt -e \
  "SELECT LEFT(data,150) AS secreto FROM secrets\G"
And this is what is stored:
There is nothing readable. Not the name of the entry, not the address of the site, not the username. All three come back NULL because their content went into metadata, encrypted, and the password lives separately in secrets, encrypted too. I went into the database with administrator credentials, from the server itself, and could not read a single thing.
Let me be clear about why this matters more than the configuration screenshot above: the settings tell you what should happen, and this tells you what does happen. That is the difference between believing a promise and checking it.
The name and the address are empty, and in their place there is a block encrypted with OpenPGP. The server holds your credentials without even knowing what they are called. That is rare in a password manager, because it complicates search, recovery and auditing, and that is precisely why almost none of them do it.
Verdict
Two containers, 219 MiB of memory at rest and 27 seconds to start. The most solid cryptographic model in its class: your private key lives in your browser and the server cannot decrypt anything, which you can verify by reading the code rather than taking it on faith.
In return it charges three tolls: the browser extension is mandatory, and with it the browser becomes a single point of failure; email is infrastructure and not an extra; and the free edition has no account recovery, which is not the same as being unable to get back in from another browser.
If you administer systems and your team is technical, those are tolls worth paying. In return you get a home for your infrastructure credentials that is neither a spreadsheet nor a private chat, with no per-seat cost, and a model you can defend in front of an auditor without looking at your shoes. It solves on a zero budget a problem that had gone unsolved precisely because of budget.
If your team is not technical, I will say it plainly: the friction of the extension and the absence of recovery are going to end up being your problem, not theirs. You will be the one taking the call on a Sunday because somebody lost their kit and cannot get in. And there will be nothing you can do.
In the next instalments we will install Vaultwarden and Psono in the same detail, and at the end we will compare all three with data from actually using them.
Keep reading on IT Rafa
- A free SMTP relay with SMTP2GO, the email Passbolt needs before you can onboard anyone
- How to install Docker and Docker Compose on Linux
- Expose your internal services to the outside world without opening ports, with a Cloudflare tunnel
- How to connect your domain to Cloudflare for free
- Install Uptime Kuma with Docker, to keep an eye on whether your Passbolt is still up
- Coldcard: the safe that manufactured predictable keys, on what happens when the cryptography fails underneath you
- Check if your email or password is in a data breach, with the explanation of why the password never leaves your browser