

Tor is known for its high level of anonymity, thanks to routing traffic through multiple volunteer nodes. That extra privacy also costs you speed compared with options like Cloudflare Tunnels or Nginx Proxy Manager. Even so, when you want to reach internal services without opening ports or buying a domain, Tor becomes a free and workable solution, especially if privacy is the priority.
In this tutorial you’ll learn how to expose an internal service on the Tor network, using as an example a basic web server built on the official nginx:alpine image, with no dependency on any custom image.
Popular Use Cases
- Access to monitoring apps
Running Uptime Kuma together with Tor lets you monitor your services from anywhere in the world, without exposing ports and with maximum privacy. - Internal test dashboards
Check your Tor setup with minimal apps like nginx:alpine before you deploy anything more complex. - An alternative to Cloudflare Tunnels or Nginx Proxy Manager
Alternatives such as Cloudflare Tunnels and Nginx Proxy Manager offer speed and simplicity with automatic SSL certificates, but Tor gives you extreme privacy without depending on a third party or buying a domain. - Lab and learning environments
If you manage containers in Docker or use Proxmox VE for virtual machines, Tor can be a simple way to test external connectivity in a lab without exposing your network. - Privacy for sensitive applications
Tor is perfect for applications that need a higher level of anonymity, such as communication servers for activists, journalists or software developers working in critical contexts.
Prerequisites
- A server or local machine running Linux.
sudopermissions to install packages and edit configuration files.- Docker installed, if you want to run containers (see How to Install Docker and Docker Compose on Linux: Step-by-Step Guide).
- An internal web service (we’ll use the official
nginx:alpineimage as an example).
Step 1: Install and Configure Tor
1. Install Tor
Run the following commands to install Tor:
sudo apt update
sudo apt install tor -y
2. Edit the Tor Configuration
Open the Tor configuration file:
sudo nano /etc/tor/torrcAdd the following lines at the end of the file:
HiddenServiceDir /var/lib/tor/hidden_service/
HiddenServicePort 80 127.0.0.1:80HiddenServiceDir: Directory where Tor will store the keys and the.onionaddress.HiddenServicePort: Maps port 80 on your local server to port 80 of the hidden service on Tor.
Save the changes (Ctrl+O, Enter) and close the file (Ctrl+X).
3. Restart the Tor Service
Restart Tor to apply the changes:
sudo systemctl restart torTor will automatically create the directory you set in HiddenServiceDir, along with the files your hidden service needs.
Step 2: Deploy a test web container
1. Run the Container
We’ll use the official nginx:alpine image with our own page mounted inside, so the example does not depend on any third-party image that has to be maintained:
First, the folder and the file we are going to serve:
mkdir -p ~/tor-demo
nano ~/tor-demo/index.html
Paste this inside. It is exactly the page you will see in the screenshots below, with one difference that matters: the animation is inlined in the file itself, not pulled from any CDN. A hidden service should not ask the open web for anything, not even a decorative script.
<!DOCTYPE html>
<html lang="es">
<head>
<meta charset="UTF-8">
<meta name="viewport" content="width=device-width, initial-scale=1.0">
<title>Web Server</title>
<style>
  * { margin: 0; padding: 0; box-sizing: border-box; }
  body {
    font-family: 'Segoe UI', Tahoma, Geneva, Verdana, sans-serif;
    background: linear-gradient(135deg, #f06, #4a90e2);
    height: 100vh; display: flex; align-items: center; justify-content: center;
    color: #fff; text-align: center; overflow: hidden;
  }
  canvas { position: fixed; inset: 0; z-index: 0; }
  .container {
    position: relative; z-index: 1;
    background: rgba(0, 0, 0, .6); padding: 40px; border-radius: 15px;
    box-shadow: 0 8px 16px rgba(0, 0, 0, .3);
  }
  h1 { font-size: 2.4rem; }
</style>
</head>
<body>
<canvas id="red"></canvas>
<div class="container"><h1>¡Welcome to my Web Server!</h1></div>
<script>
// Dot network. Inlined on purpose: a hidden service should not ask the open
// web for anything, not even a decorative script.
const c = document.getElementById('red'), x = c.getContext('2d');
let p = [];
function medir() {
  c.width = innerWidth; c.height = innerHeight;
  p = Array.from({ length: Math.min(90, innerWidth / 14) }, () => ({
    x: Math.random() * c.width, y: Math.random() * c.height,
    vx: (Math.random() - .5) * .4, vy: (Math.random() - .5) * .4
  }));
}
function pintar() {
  x.clearRect(0, 0, c.width, c.height);
  x.fillStyle = x.strokeStyle = 'rgba(255,255,255,.55)';
  for (const a of p) {
    a.x += a.vx; a.y += a.vy;
    if (a.x < 0 || a.x > c.width) a.vx *= -1;
    if (a.y < 0 || a.y > c.height) a.vy *= -1;
    x.fillRect(a.x, a.y, 2, 2);
  }
  for (let i = 0; i < p.length; i++)
    for (let j = i + 1; j < p.length; j++) {
      const d = Math.hypot(p[i].x - p[j].x, p[i].y - p[j].y);
      if (d < 130) {
        x.globalAlpha = (1 - d / 130) * .35;
        x.beginPath(); x.moveTo(p[i].x, p[i].y); x.lineTo(p[j].x, p[j].y); x.stroke();
        x.globalAlpha = 1;
      }
    }
  requestAnimationFrame(pintar);
}
addEventListener('resize', medir); medir(); pintar();
</script>
</body>
</html>
Now bring the container up:
docker run -d --name web-tor -p 127.0.0.1:80:80 -v ~/tor-demo:/usr/share/nginx/html:ro nginx:alpineNote the 127.0.0.1 in that command, because it is not a detail. Publishing with a plain -p 80:80 would leave the container reachable on every interface of the server, including the one facing your network or the internet. That has a concrete consequence for what we are after: anyone could request the same page over the clear web from your IP, compare it with what your .onion serves, and conclude they are the same machine. Binding to 127.0.0.1 means the only thing that can reach it is Tor, which is exactly what your torrc says.
-d: Runs the container in the background.--name web-tor: Gives the container a name.-p 127.0.0.1:80:80: Maps port 80 in the container to port 80 on your host, but on loopback only. Without the127.0.0.1it would be published on every interface.
2. Verify the Service Locally
If you’re on the same machine that hosts the container, open a browser and go to http://localhost
If the container is running in a VM or an LXC container on Proxmox (or any other remote server), first find its IP address with:
ip aIn my case it’s:
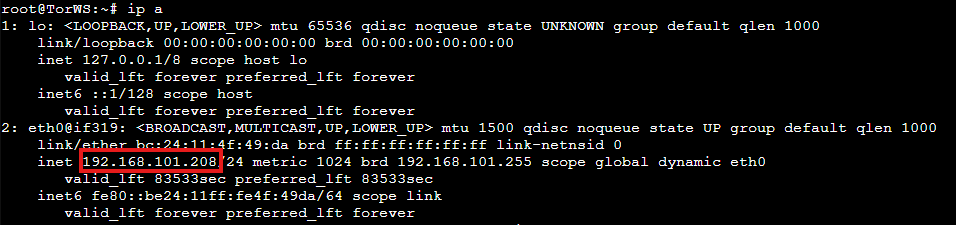
Then, in your browser (from another machine on the same network), visit http://<IP-address>. You should see your test page, confirming the web server is running correctly.

Step 3: Get Your .onion Address
Get the Hidden Service Address
sudo cat /var/lib/tor/hidden_service/hostnameThis command shows you your .onion address. In my case exakxafo34v2qcnt7ab2pntkfxxj6afeni237bkpgrvuyqxca7psveyd.onion

Protect and Back Up the Hidden Service Directory
Make sure you protect the private keys stored in /var/lib/tor/hidden_service/. If you lose those files or they get deleted, your .onion address will change. To keep the same address if you ever restore the service or move it to another machine, back up this directory somewhere safe.
sudo chmod -R 700 /var/lib/tor/hidden_service/
sudo chown -R debian-tor:debian-tor /var/lib/tor/hidden_service/
These lines restrict access to the keys and make sure only the debian-tor user (the account Tor runs as) can modify them.
Step 4: Access the Service from Tor
- Install Tor Browser
Download the Tor Browser on your local device. - Open the .onion Address
Launch Tor Browser and go to the.onionURL generated in the previous step.

Extra Options: Internal HTTPS
Tor already encrypts traffic between the client and the last Tor node, but enabling HTTPS on your local service adds end-to-end encryption, so the communication is protected even inside your own network. That matters in production environments where several devices or users could intercept unencrypted traffic on the LAN
Next Steps
- Expose More Complex Services
Once you’ve confirmed things work with this test, expose apps like Uptime Kuma, Nextcloud or admin panels such as Proxmox VE. - Explore Alternatives
For services that need more speed, consider options like Cloudflare Tunnels or Nginx Proxy Manager. - Harden Security
Enable passwords or authentication on your services to keep unwanted visitors out. - Virtualization and Test Environments
If you use Proxmox VE, you can expose services running in LXC containers or virtual machines through Tor.
Extra Tips
Recording Tor Logs
To debug errors or confirm that your service starts correctly, check the Tor logs:
journalctl -u torIf you’d rather send the logs to a specific file, open the configuration file /etc/tor/torrc and add the following line
Log notice file /var/log/tor/notices.logThat turns on “notice” level logging in the file /var/log/tor/notices.log. Make sure you restart Tor so the changes take effect:
sudo systemctl restart torFrom there you can review detailed events and any warnings about the hidden service.
Using Multiple Ports
If you want to expose more than one port (say, 80 and 443) on your hidden service, just add extra lines to your torrc:
HiddenServicePort 80 127.0.0.1:80
HiddenServicePort 443 127.0.0.1:443
That way you can handle HTTP and HTTPS at the same time.
Permissions in Containers
If your server hosts several applications, consider binding your containers to 127.0.0.1 (instead of 0.0.0.0) to tighten security. That way the service is only reachable locally, and Tor takes care of exposing it to the outside world without a public bind.
Conclusion
Exposing internal services on the Tor network is a practical way to guarantee privacy without buying a domain or opening ports on your router. Tor’s speed is limited, but it’s ideal for small projects, test environments and sensitive services where anonymity comes first.
For most projects, the speed and easy setup of Cloudflare Tunnels and Nginx Proxy Manager will look more attractive. But if privacy is the priority, or you want an experimental setup without exposing ports or buying a domain, Tor is an invaluable tool.
Questions or suggestions? Leave them in the comments! 😊