

Want to power on your Proxmox server from anywhere without touching a single button? Wake-on-LAN (WOL) lets you do exactly that by sending a “magic packet” across the network. This tutorial shows you how to enable and configure WOL on a Proxmox node so you can boot your server remotely. Let’s get started!
Prerequisites
- Access to the Proxmox shell with root privileges (the commands don’t use
sudobecause we assume you are logged in as root in the Proxmox shell). - A wired network connection (WOL does not work over Wi-Fi).
- Another device on the same network to send the WOL packet.
ethtoolinstalled on the Proxmox node.- Hardware WOL support (your motherboard and network card must support Wake-on-LAN, and it has to be enabled in the BIOS/UEFI).
Note: If you run a Proxmox cluster, you will need to repeat this process on every node so all of them can be woken up with Wake-on-LAN.
Step 1: Install ethtool
ethtool is an essential utility for managing network interface settings on Linux. We will need it to turn on the WOL feature.
Run the following commands to install ethtool on your Proxmox node:
apt update
apt install ethtool
Before going further, there is something you will hit the moment you run apt update: Proxmox ships with the paid repositories enabled and the command fails. It takes five minutes to fix, and it is covered step by step, Ceph included, in no-subscription repositories on Proxmox VE. Come back here once apt update finishes without errors.
Step 2: Identify the Network Interface
To configure WOL, you need to know the name of the network interface connected to your local network.
List all the network interfaces by running:
ip addrLook for an interface with a name like eth0, ens18, or eno1.
When you run ip addr on Proxmox, you get detailed information about the network interfaces. Here is how to read that output.
Sample ip addr Output:
root@pvelab:~# ip addr
1: lo: <LOOPBACK,UP,LOWER_UP> mtu 65536 qdisc noqueue state UNKNOWN group default qlen 1000
    inet 127.0.0.1/8 scope host lo
    inet6 ::1/128 scope host
2: ens18: <BROADCAST,MULTICAST,UP,LOWER_UP> mtu 1500 qdisc pfifo_fast master vmbr0 state UP group default qlen 1000
    inet6 fe80::bc24:11ff:fe81:a174/64 scope link
3: vmbr0: <BROADCAST,MULTICAST,UP,LOWER_UP> mtu 1500 qdisc noqueue state UP group default qlen 1000
    inet 10.0.0.49/24 scope global vmbr0
    inet6 fe80::be24:11ff:fe81:a174/64 scope link
How to Identify Each Interface:
- By name:
lo: Always the loopback interface.ens18: Indicates a physical Ethernet interface.vmbr0: Denotes a virtual network bridge.
- By MAC address:
ens18andvmbr0: They share the same MAC address, which meansvmbr0is bridgingens18.
- By IP address:
vmbr0: Has an IP address assigned (10.0.0.49/24), which is the Proxmox host IP on the network.
- By state and role:
ens18: Configured as a bridge member (master vmbr0), so it does not handle traffic directly.vmbr0: Handles network traffic for the host and the virtual machines.
You can also check the interface from the Proxmox web interface:

- Go to Datacenter > Node (your node) > System > Network.
- Find the main interface you use to connect to the network.
Write down the name of the interface you are going to use. In this example, we will use ens18.
Step 3: Check the WOL Status
To find out whether WOL is enabled on your network interface, use ethtool:
ethtool ens18Look for the line that says Wake-on:. The possible values are:
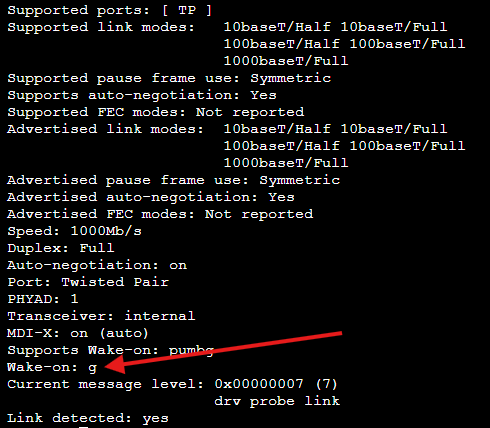
- d – Disabled.
- g – Enabled for magic packets.
If you see Wake-on: d, WOL is disabled and you need to turn it on.
Step 4: Enable WOL Temporarily
To turn WOL on for the current session (it will not survive a reboot), run:
ethtool -s ens18 wol gTo verify, run this again:
ethtool ens18Make sure it now shows Wake-on: g.
Step 5: Make WOL Permanent
For WOL to stay enabled even after a reboot, you have to add the setting to the interfaces file.
- Edit the
/etc/network/interfacesfile:
nano /etc/network/interfaces- Find the section for your network interface, which should look something like this:
   auto ens18
iface ens18 inet manual- Add the following line below
iface:
post-up /sbin/ethtool -s ens18 wol gThe end result should look like this:
   auto ens18
   iface ens18 inet manual
post-up /sbin/ethtool -s ens18 wol g- Save the changes and close the editor:
- Press
Ctrl + O, thenEnterto save. - Press
Ctrl + Xto exit.
Step 6: Refresh the Configuration in Proxmox
To make Proxmox apply the new network configuration:

- In the Proxmox web interface, go to Datacenter > Node > System > Network.
- Select your network interface and click Edit.

- Check the Autostart option so the interface comes up automatically at boot.
- Click OK to save the changes.

- Click “Apply Configuration”
Step 7: Test the Configuration
Check the WOL Status After a Reboot
- Reboot your Proxmox node:
reboot- After the reboot, check again that WOL is still enabled by running:
ethtool ens18Make sure Wake-on: g is still active.
Shut Down the Node
To test that WOL works, shut your node down cleanly:
shutdown -h nowSend the Wake-on-LAN Packet
From another device on the same network, send the WOL packet to the MAC address of your Proxmox node.
Get the MAC Address
On the Proxmox node (before you shut it down), run:
ip link show ens18The MAC address shows up on the line that starts with link/ether. Write that address down.

Send the WOL Packet
- On Linux: Install
wakeonlan:
apt install wakeonlanSend the packet with:
wakeonlan <mac_address>- On Windows: You can use tools like:
- Wake on LAN (Magic Packet), straight from the Microsoft Store
- Depicus Wake on LAN GUI
- WakeMeOnLan
- On Android/iOS: Search for “Wake on LAN” in your app store and pick an app.
Add your Proxmox node to the app using its MAC address, give it a name and pick an icon

Once it is added, just double-click on it and you will send the Magic Packet

Does the Node Power On?
If everything is configured correctly, your Proxmox node should power on automatically when it receives the WOL packet. Congratulations!
Conclusion
Enabling Wake-on-LAN on your Proxmox node lets you power on your server remotely, which is ideal for saving energy and managing your resources efficiently. By following these steps you can configure WOL permanently and make sure it keeps working even after the system reboots.
Important Notes:
- Proxmox cluster: If you run a cluster, you have to repeat this process on every node so all of them can be woken up with Wake-on-LAN.
- Root privileges: The commands do not use
sudobecause we assume you are running them from the Proxmox shell as root. You need root privileges to make these changes. - Hardware compatibility: Make sure your hardware (motherboard and network card) supports Wake-on-LAN and that it is enabled in your server BIOS/UEFI settings.
- Network configuration: Some routers block WOL packets; check your network settings if you run into problems.
Questions or running into trouble? Leave me a comment and I will be glad to help!
Your support can make a big difference to our progress and innovation. If this tutorial helped you, consider sharing it with other people interested in Proxmox and Wake-on-LAN.
Troubleshooting: WOL Is Not Working
If you sent the Magic Packet but the server does not power on, check these common culprits:
- BIOS/UEFI: make sure Wake-on-LAN is enabled in the BIOS. Look for options like “Power On by PCI-E”, “Wake on LAN” or “Resume by PME”.
- Managed switch: some switches block broadcast traffic by default. If you use VLANs, make sure the Magic Packet reaches the right VLAN.
- Network cable: WOL needs a wired Ethernet connection. It does not work over Wi-Fi.
- Power-off state: WOL works from a clean shutdown (
shutdown). If the server went down because of a power cut, WOL will not be able to bring it back: you will need to set up “AC Power Recovery” in the BIOS for those cases. - Router firewall: if you send the WOL packet from outside the local network, you need to forward UDP port 9 or use a VPN.
Related Reading
- Install Proxmox VE from scratch: if you do not have Proxmox installed yet
- Proxmox from scratch: the conceptual guide: understand the fundamentals before you start configuring
- Install Uptime Kuma: monitor that your server responds correctly after every remote boot